How to Set Up an API Target
Last updated: June 26, 2026
Introduction
This guide walks you through the complete process of setting up an API target in Astra, from entering your base URL to configuring authentication and verifying ownership. Once set up, Astra's vulnerability scanner can thoroughly assess your API endpoints for security issues.

Pre-requisites (For Pentest/Manual Scan)
Before starting the setup, ensure the following details are available :
Mandatory:
Scope URL
Share a non-production environment URL (preferably QA or Staging) for testing.User Roles & Credentials
Provide login credentials for all relevant user roles (e.g.,admin,user, etc.).
It’s recommended to create temporary accounts, as test data may be added.Requirements for the Automated Scanner
Astra’s automated scanner is the first step in your Pentest journey. As soon as the scan begins, results start appearing in real time. You can refer to the step-by-step guide below to set it up.OTP / Authenticator Flows
For apps using OTPs, magic links, or authenticator apps:Ideally, provide a static OTP or a bypass mechanism.
This ensures seamless authenticated scanning.API Integration (If Applicable)
Base URL of your API
OpenAPI Specification (JSON/YAML) to improve crawl coverage (optional but highly recommended)
Instructions
Step 1: Verify Ownership
Before configuring your API target, you must verify that you own the domain or application. This ensures only authorized users can initiate scans.
Go to the Targets page. Under the Pending Verification section, click Start Verification next to your target.

Fill in the Application Name, Business Name, and Target URL.
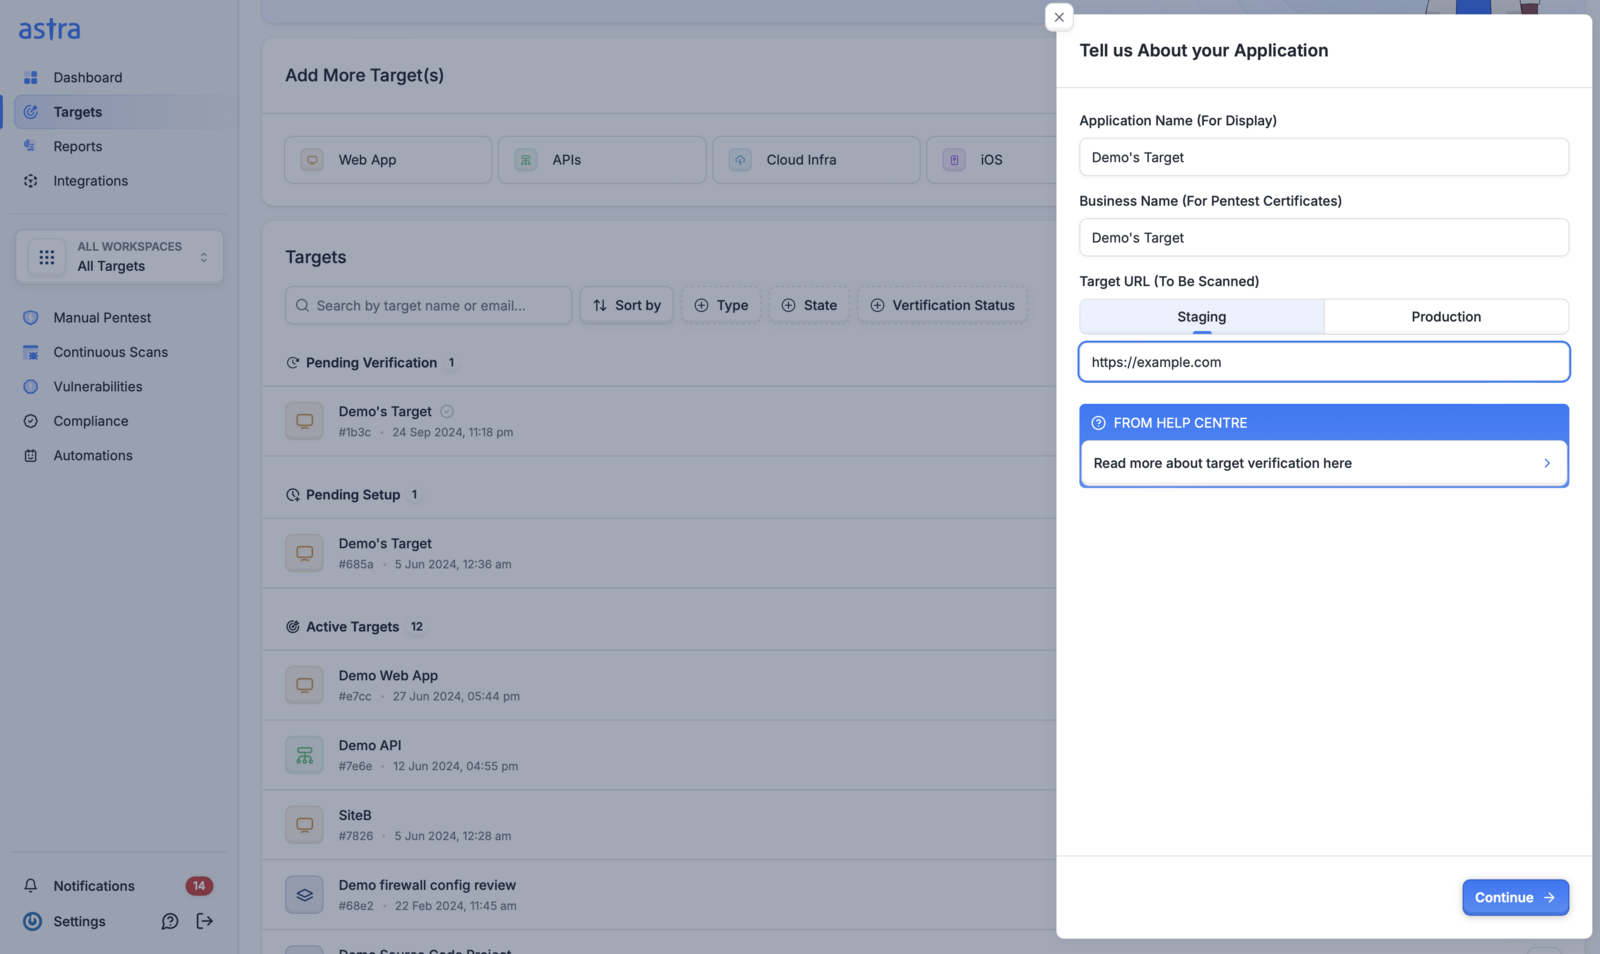
Select Manual Verification. Astra's support team will verify ownership within 12–24 hours. You will receive an email once approved.

Once verified, your target moves from Pending Verification to Pending Setup.

Step 2: Access the Target Setup Wizard
Navigate to the Targets page and click Setup Target. You will be directed to the target setup wizard where you can configure your API target across the following steps.

Step 3: Get Started
Provide the basic details about your application:
Application Name : the display name for your API as it will appear in the dashboard.
Base URL : the root URL of your API, including the correct protocol (
http://orhttps://) and full domain name. All endpoint paths are resolved relative to this URL.
Example: https://api.example.com/
Scan Scope and Crawl Settings
To avoid scanning unnecessary third-party services, define your scan scope precisely:
Target URL — the base domain or path the scanner will start from (e.g.
https://app.example.com)Scope — limits the scan to specific subdomains or URI paths
Configure how much of your domain tree the scanner should explore:
All Subdomains — includes all subdomains such as
app.example.com,api.example.comTarget Subdomain Only — restricts the scan to the exact domain or subdomain entered
Starting with URI — limits the crawl to paths starting with a specific prefix, e.g.
/admin
Additional Hosts
If your application uses other hostnames — CDNs, microservices, or external APIs — add them here so they are included in the scan scope.
Step 4: API Details
Choose how you want to share your API structure with Astra. This helps build an endpoint inventory for scanning. Select one of the following:
OpenAPI Spec File : upload your exported OpenAPI specification. This allows Astra to classify risks based on your documented endpoints.
Postman Collection : upload a Postman Collection file to build an endpoint inventory for DAST scans.
Traffic Collector : connect a Traffic Collector to automatically discover endpoints from live API traffic.
Step 5: Definition Files
Upload the relevant files based on your selection in the previous step:
Postman Collection : outlines the requests, endpoints, and workflows your API uses.
Postman Environments (if applicable) : configures the testing environment (development, staging, or production).
OpenAPI Document (optional) : provides a detailed map of your API endpoints for more precise scanning.
Step 6: User Roles and Login Configuration
If your application requires authentication to access certain areas, configure user roles and login recording here. This ensures the scanner can reach and test authenticated endpoints.
User Roles
Create accounts for each user role your application supports (e.g. Admin, User, Manager).
Provide the credentials for each role during setup.
Note: Use temporary accounts where possible to avoid unwanted test data being written to your environment.
Login Recording
Use Chrome DevTools Recorder to capture your application's login flow. This allows the scanner to authenticate automatically during the scan.
Record the login steps and upload the recording during setup.
Set a session timeout (in seconds) so the scanner reauthenticates when the session expires.
OTP and Authenticator Flows
For applications using OTPs, magic links, or authenticator apps, provide a static OTP or a bypass mechanism where possible. This ensures the scanner can complete the login flow without interruption.
Step 7: API Authentication
Many APIs are secured, and the scanner must authenticate to access your endpoints. Providing the correct authentication method is critical . without it, the scanner will fail to reach protected endpoints.
You can configure authentication either during target setup or later from the API Target Settings page.


Workflow
Select an Authentication Type from the dropdown.
Fill in the required fields for that type (fields change based on your selection).
Click Verify Credential : the system will make a live test request. A 2xx response confirms the credentials are valid.
Click Save Credential : credentials are not stored until you explicitly save them. Verification alone does not persist your settings.
Supported Authentication Types
Basic Auth
Inputs:
Username,Password
bash
curl -v -u "username:password" -X POST https://api.example.com/secureOAuth 2.0 Client Credentials Grant
Inputs:
Access Token URL,Client ID,Client Secret
bash
curl -v -X POST https://auth.example.com/token \
-d "grant_type=client_credentials" \
-d "client_id=abc123" \
-d "client_secret=xyz789"
OAuth 2.0 Password Credentials Grant
Inputs:
Access Token URL,Client ID,Client Secret,Username,Password
bash
curl -v -X POST https://auth.example.com/token \
-d "grant_type=password" \
-d "client_id=abc123" \
-d "client_secret=xyz789" \
-d "username=john" \
-d "password=doe"
Bearer Token (Static)
Inputs: Static token string
bash
curl -v -H "Authorization: Bearer YOUR_TOKEN_HERE" \ -X POST https://api.example.com/resourceJWT Bearer
Inputs:
Algorithm(HS256 or RS256),Secret(base64 encoded),JWT Payload & Header,Header Prefix,Header Name
bash
curl -v -H "Authorization: Bearer <JWT_TOKEN>" \ -X POST https://api.example.com/dataCustom API Key
Inputs:
Header Name(e.g.x-api-key),Header Value(e.g.abc123)
bash
curl -v -H "x-api-key: abc123" \ -X POST https://api.example.com/secureDon't see a matching authentication option? If your required method isn't listed, you can configure authentication using a Custom Script instead.
Step 8: Tech Stack and Application Details
Providing context about your application helps Astra improve scan accuracy and assists security engineers during manual testing.
Optimize Tech Stack
Select the technologies your application uses — frameworks (React, Django), languages, CMSs, and so on. This helps the scanner:
Improve vulnerability detection accuracy
Reduce false positives
Speed up scan duration
Application Details
Give a brief overview of your application's purpose and key features. For example:
A SaaS app for booking appointments online. Users can view availability, schedule, and pay through the portal. Built with a Vue.js frontend and Node.js backend.
This context helps Astra's security engineers create business logic test cases during manual testing.
Step 9: Advanced Settings
Fine-tune how the scanner interacts with your API.
Extra HTTP Headers
Add custom headers that will be attached to every scanner request. Useful for:
Cloud API gateways that require routing headers (e.g.
x-api-key,x-tenant-id)WAF/firewall environments that enforce security controls via headers
Internal services using non-standard header-based authentication
URL Exclusion Regex
Define regex patterns for URLs the scanner should skip. Common uses:
Health and readiness probes (
/health,/status,/metrics)Static asset endpoints (
/assets/.*\.(png|jpg|css|js)$)Admin paths that should not be scanned in automated mode
Step 10: Additional Notes
Use this section to provide context that may affect the scan, such as:
Special authentication methods or tokens required for access
Rate limiting or throttling details
Endpoints to prioritize or avoid
Any known quirks or non-standard configurations in your API
Step 11: Complete Setup
Review all your entries and click Complete Setup to finalize the target configuration. Once saved, you can initiate a scan to begin testing your API for vulnerabilities.
Note: Any configuration changes made while a scan is in progress will only take effect from the next scan onwards.
For assistance, raise a support ticket from the Astra dashboard.
Troubleshooting
Scanner is not reaching my API endpoints
Symptoms
Scan completes but reports zero endpoints tested
Scanner returns authentication errors on all requests
Causes & Fixes
Incorrect Base URL — confirm the URL includes the correct protocol (
http://orhttps://) and resolves publicly or from Astra's network. A trailing slash mismatch can also cause routing failures.Authentication not saved — verification alone does not persist credentials. Ensure you clicked Save Credential after verifying. Return to API Auth settings to confirm.
Wrong authentication type selected — verify that the auth type matches what your API actually requires. For example, selecting Bearer Token when the API expects OAuth 2.0 Client Credentials will result in rejected requests.
Token has expired — static Bearer Tokens and JWT tokens have expiry windows. Regenerate a fresh token and update the credential settings before re-running the scan.
Credential verification is failing
Symptoms
Clicking Verify Credential returns a non-2xx response
Verification times out
Causes & Fixes
Wrong credentials — double-check the values entered. For OAuth 2.0, confirm the Access Token URL is correct and reachable.
API is behind a firewall or allowlist — if your API restricts inbound traffic by IP, whitelist Astra's scanner IPs. Reach out to support to obtain the current IP range.
JWT secret not base64 encoded — the JWT Bearer type requires the secret to be base64 encoded. Encoding a plain-text secret and retrying usually resolves this.
Rate limiting on the token endpoint — if your auth server throttles repeated requests, wait a few minutes before retrying verification.
No endpoints are appearing in the scan results
Symptoms
Scan runs successfully but the endpoint inventory is empty or incomplete
Causes & Fixes
Definition file not uploaded — confirm that your Postman Collection or OpenAPI spec was successfully uploaded in the Definition Files step. Re-upload if the file is missing.
Postman Collection references unresolved environment variables — if your collection uses
{{variables}}, make sure the corresponding Postman Environment file was also uploaded.Traffic Collector not receiving traffic — if you selected the Traffic Collector method, verify the collector is running and actively receiving live traffic before initiating the scan.
Endpoints excluded by regex — review your URL Exclusion Regex patterns in Advanced Settings. An overly broad pattern may be inadvertently excluding valid endpoints.
Target is stuck in Pending Verification
Symptoms
Target has not moved to Pending Setup after 24 hours
Causes & Fixes
Verification request not submitted correctly — confirm you completed all fields (Application Name, Business Name, Target URL) and selected Manual Verification before submitting.
Email notification missed — check your spam or junk folder for the approval email from Astra.
If more than 24 hours have passed, raise a support ticket from the Astra dashboard for a status update.
Best Practices
Verify against a stable environment Run the target setup and credential verification against a staging or pre-production environment that mirrors production closely. Avoid pointing the scanner at a live production API unless you have confirmed it can handle the additional load.
Use short-lived tokens only for verification, not for saved credentials If your API issues short-lived Bearer or JWT tokens, do not use a token that will expire soon as your saved credential. Set up OAuth 2.0 with Client Credentials or Password grant instead — the scanner will automatically fetch fresh tokens before each scan.
Keep your definition files up to date Your Postman Collection or OpenAPI spec defines the endpoint inventory the scanner works from. Re-upload updated files whenever new endpoints are added or existing ones change, to ensure full coverage.
Be specific with URL exclusion patterns Overly broad regex patterns in the URL Exclusion field can silently skip large portions of your API. Test your patterns against a sample URL list before applying them, and document the reason for each exclusion in the Additional Notes field.
Use Extra HTTP Headers for environment routing, not authentication Extra HTTP Headers are best suited for gateway routing headers (x-tenant-id, x-api-key) or WAF bypass headers — not as a substitute for proper authentication configuration. Authentication should always be handled through the API Auth step so credentials can be verified and rotated independently.
Document non-standard configurations in Additional Notes If your API has rate limiting, unusual authentication flows, or endpoints that behave differently under load, record these in the Additional Notes step. This context helps Astra's security engineers interpret scan results accurately and avoid false positives.
Restrict scanner access to non-destructive endpoints where needed If your API includes endpoints that trigger irreversible actions (e.g. sending emails, deleting records, processing payments), use URL Exclusion Regex to exclude them from automated scanning, or flag them explicitly in Additional Notes.