How to set up Astra Traffic Monitoring with AWS Mirroring
Last updated: June 11, 2026
Introduction
AWS supports traffic mirroring for the instances running in a VPC. Read this article to understand how AWS traffic mirroring can be used for API observability
Architecture
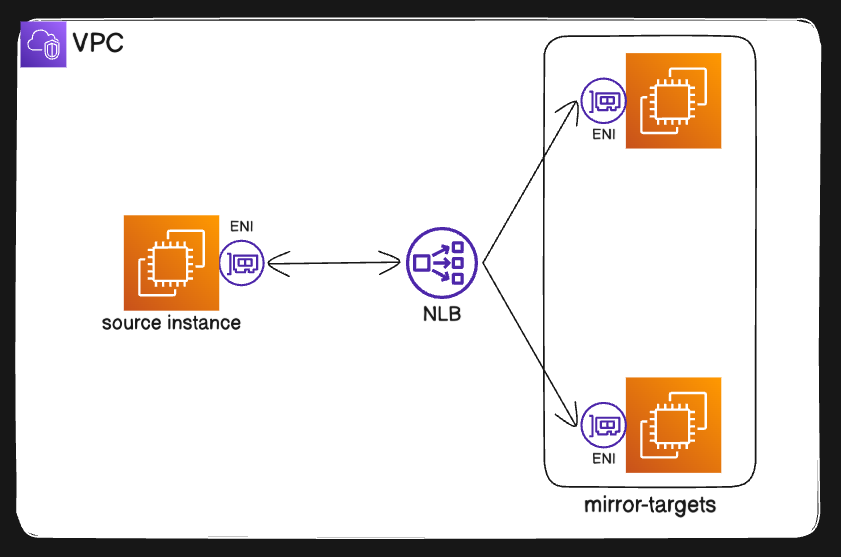
What's Not Supported
Classic instances or instances based on the Xen hypervisor (e.g.,
t2, but supported on select non-Nitro instance types.Traffic mirroring does not natively support cross-VPC mirroring without additional configuration, such as using Transit Gateway or VPC Peering
Security group rules and network ACL rules on the traffic mirror target cannot drop the mirrored traffic from the traffic mirror source.
Assumptions
Source and target instances already exist but for reference look at the setup below.
The appropriate permissions are set to configure traffic mirroring.
Prerequisites
Same VPC: Source, NLB, and target instances must belong to the same VPC.
Health Check: Enable health checks on the NLB's target group to ensure proper traffic routing.
Firewall Rules: Security groups and NACLs should allow mirrored traffic to reach the target instances. The traffic mirror target must allow traffic to UDP port 4789.
Nitro Instances: Use Nitro-based instances for the source to enable mirroring.
Nitro-based instances are the newer generation of AWS EC2 instances built with the Nitro System, which provides enhanced security, better performance, and support for features like Traffic Mirroring, Elastic Network Adapters (ENA), and more.
Few Examples of Nitro-Based Instances:
| Use case | Instance Type | | ---- | | General Purpose | t3, t4g, m5, m6g | | Compute Optimized | c5, c6g | | Memory-Optimized | r5, r6g | | Storage-Optimized | i3en, i4g |
You can check the full list of Nitro-based instances in the AWS Documentation.
Installation
Step 1: Create a VPC and Subnets
If your VPC already meets the requirements, you can skip the VPC creation step and proceed directly to launching instances or configuring Traffic Mirroring.
While the source and target instances can be in different subnets, they must still belong to the same VPC.
1.1 Create the VPC
Open the AWS Management Console and navigate to the VPC Dashboard.
Click Create VPC.
Configure the VPC:
Name: Provide a meaningful name, such as
my-traffic-mirroring-vpc.CIDR Block: Set this to
10.0.0.0/16to provide a large range of IP addresses.
DNS Settings:
Enable DNS Hostnames to allow resolution of instance public IPs.
Enable DNS Resolution to support internal DNS resolution within the VPC.
Click Create.
1.2 Create the Subnets
While in the VPC Dashboard, navigate to the Subnets section and click Create Subnet.
Create two subnets:
Subnet A (for the source instance):
Name:
source-subnet.CIDR Block:
10.0.1.0/24.Associate this with the VPC created above.
Subnet B (for the target instances and the Network Load Balancer):
Name:
target-subnet.CIDR Block:
10.0.2.0/24.Associate this with the same VPC.
Step 2: Launch EC2 Instances
If your VPC already meets the requirements, you can skip the launching of instances and proceed directly to configuring Traffic Mirroring.
2.1 Launch the Source Instance
Navigate to the EC2 Dashboard and click Launch Instance.
Configure the instance:
Name: Set a descriptive name, such as
source-instance.AMI: Choose a base image like Amazon Linux 2.
Instance Type: Select a Nitro instance like
t3.microor larger as needed.
Network Settings:
VPC: Select the VPC you created earlier.
Subnet: Select
source-subnet(created in Step 1.2).Enable Auto-Assign Public IP to allow remote access.
Security Group:
Create or assign a security group allowing:
SSH (TCP: 22) from your IP address.
Any other application-specific ports (e.g., HTTP for web traffic).
Launch the instance.
2.2 Launch the Target Instances
Launch two instances in a similar way as above but with these differences:
Name: Use descriptive names like
target-instance-1andtarget-instance-2.Subnet: Select
target-subnet(created in Step 1.2).
Security Group:
Create or assign a inbound security group allowing:
SSH (TCP: 22)
HTTP (TCP: 80)
UDP 4789
Step 3: Create a Network Load Balancer
The NLB handles the actual routing of mirrored packets to the target instances, making the setup efficient and scalable.
Navigate to the EC2 Dashboard → Load Balancers → Create Load Balancer.
Select Network Load Balancer.
Configure the NLB:
Name: Provide a descriptive name, such as
my-traffic-mirroring-nlb.Scheme: Select Internal since this is for private traffic.
Network Mapping: Assign the NLB to
target-subnet.Listeners: Add a listener for TCP traffic.
Create a Target Group for the NLB:
Target Type: Instance.
Protocol: TCP.
Targets: Register both
target-instance-1andtarget-instance-2.
Complete the NLB setup.
Step 4: Create a Traffic Mirror Target
The traffic mirror target is where mirrored traffic from the source instance will be sent. In this case, the target can be a Network Load Balancer (NLB), an Elastic Network Interface (ENI), or an Amazon EC2 Instance.
Navigate to the VPC Dashboard → Traffic Mirroring → Create Mirror Target.
Configure the mirror target:
Name: Provide a meaningful name, such as
nlb-mirror-target.Target Type: Select Network Load Balancer.
Load Balancer: Select the NLB created in Step 3.
Click Create Mirror Target.
Step 5: Create a Traffic Mirror Filter
Traffic mirroring can generate a lot of data. Filters help you capture only the traffic that’s relevant to your analysis, reducing overhead and improving focus.
Navigate to Traffic Mirroring → Traffic Mirror Filters → Create Filter.
Configure the filter:
Name: Use a descriptive name like
traffic-mirror-filter.Rules:
Start with broader filters (e.g., 0.0.0.0/0) during testing and troubleshooting and later capture and deliver traffic only from a specific subnets
Add Ingress Rule:
Protocol: TCP (or All, if needed).
Source CIDR: 0.0.0.0/0 (all traffic).
Destination CIDR: 0.0.0.0/0.
Action: Accept.
Add Egress Rule: Repeat the same configuration as for Ingress.
(Optional) Add a Reject Rule:
Protocol: TCP.
Port: 22 (to reject SSH traffic).
Save the filter.
Step 6: Create a Traffic Mirroring Session
A traffic mirror session ties everything together. It defines which source instance’s traffic will be mirrored, where that traffic will go (the mirror target), and which filter to apply.
Navigate to Traffic Mirroring → Traffic Mirror Sessions → Create Session.
Configure the session:
Name: Provide a name like
my-traffic-mirror-session.Source: Select the ENI (Elastic Network Interface) of the source instance.
Target: Select the mirror target created in Step 4 (
nlb-mirror-target).Filter: Choose the filter created in Step 5.
Session Number: Assign a session number (e.g., 1 for priority).
Packet Length: Leave default (65536 to capture full packets).
Click Create Traffic Mirror Session.
What next? Setup Astra Packet Processor
Troubleshooting
1. Does AWS Traffic mirroring incur any cost?
Yes there is a pricing plan set by AWS for using traffic mirroring. It can be seen under Network Analysis section of https://aws.amazon.com/vpc/pricing/