How to setup Astra Traffic Monitoring with GCP Mirroring
Last updated: June 11, 2026
Introduction
GCP supports packet mirroring for instances running in a VPC. This guide walks you through configuring GCP packet mirroring to capture API traffic and forward it to Astra for observability.
Architecture
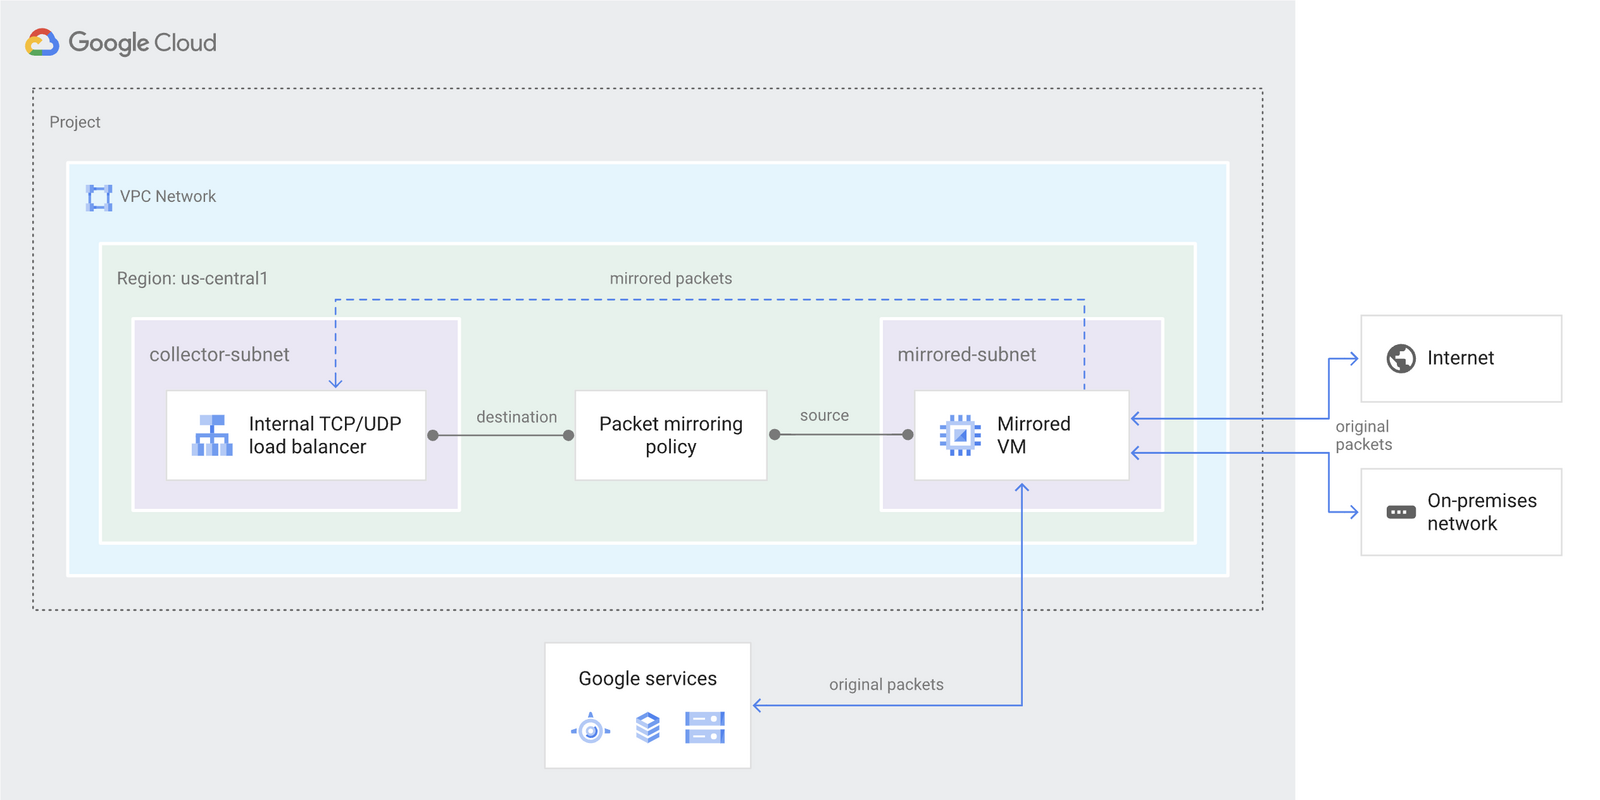
GCP packet mirroring copies traffic from source instances and sends it to a collector via an internal load balancer. The mirrored traffic is then processed by Astra Packet Processor to create API traces
Requirements
Source instance, target backend, and load balancer must all belong to the same VPC.
All mirrored sources must be in the same GCP project, VPC network, and region.
Health checks must be enabled on the target backend.
Firewall rules must allow mirrored traffic to reach the collector.
What's Not Supported
You cannot mirror and collect traffic on the same network interface of a VM instance, as this causes a mirroring loop.
For other limitations, refer to the official GCP Packet Mirroring documentation.
Assumptions
Source instances already exist in your infrastructure and are generating traffic.
All instances (source and target) are in the same VPC and region.
Setup Steps
If you already have target instances, skip this step and proceed to the next one.
Step 1: Create Target Compute Instances
Skip this step if target instances already exist.
Navigate to VM instances and click Create Instance.
Create a target VM with the following configuration:
Name: target-instance
Machine Type: e2-standard or equivalent
Image: Debian 11 or another suitable image
Under Networking, select the VPC network and subnet that match the source instance.
Repeat the above to create target-instance-2.
Step 2: Create a Health Check
Health checks confirm that target instances are available and functioning.
Navigate to Health Checks and click Create Health Check.
Configure with the following:
Name: my-healthcheck
Protocol: TCP
Port: 80
Save the health check.
Step 3: Create an Instance Group
Navigate to Instance Groups and click Create Instance Group.
Configure with the following:
Name: target-instance-group
Add target-instance and target-instance-2 to the group.
Step 4: Create a Backend Service
The backend service routes traffic to the VM instances in your instance group.
Go to Google Cloud Console, then Network Services, then Load Balancing, then Backend Services.
Create a new backend service with:
Name: my-service
Load Balancing Scheme: Internal
Protocol: TCP
Add the health check my-healthcheck created in Step 2.
Under Backends, click Add Backend, choose Instance Group, and select target-instance-group.
Leave other settings as default and save.
Step 5: Create a Forwarding Rule
A forwarding rule directs traffic to your backend service.
From the Load Balancing page, click the Frontend Configuration tab.
Create a forwarding rule with:
Name: my-ilb
Load Balancing Scheme: Internal
Network: my-network
Subnetwork: my-subnetwork
Protocol: TCP
Check Enable Mirroring Collector.
Select the backend service my-service created in Step 4.
Save the forwarding rule.
Step 6: Create Firewall Rules
Avoid using 0.0.0.0/0 unless absolutely necessary (e.g., for public-facing applications), always specify your trusted source IP or network range, allow mirrored traffic to target-backend)
Create Rules
Rule for SSH (
allow-ssh)
Name:
allow-sshNetwork:
my-networkUnder Allow, set:
Protocol: TCP
Ports: 22
Source IP Ranges: Your trusted source (or
0.0.0.0/0to allow all IPs).
Rule for HTTP (
allow-http)
Name:
allow-httpNetwork:
my-networkUnder Allow, set:
Protocol: TCP
Ports: 80
Source IP Ranges: Your trusted source (or
0.0.0.0/0to allow all IPs).
Rule for Return Traffic (
allow-return-traffic)
Name:
allow-return-trafficNetwork:
my-networkUnder Allow, set:
Protocol: TCP
Ports: 1024-65535
Source IP Ranges: Your trusted source (or
0.0.0.0/0to allow all IPs).
Step 7: Create Packet Mirroring
Packet mirroring is used to copy traffic from the source instance and send it to the collector (the internal load balancer). This ensures traffic is distributed to both target instances for further analysis.
Navigate to Packet Mirroring:
Go to Network Security → Packet Mirroring → Create Policy.
Configure the policy:
Name:
my-mirroringDescription: Add an optional description.
Collector:
Select the forwarding rule (
my-ilb) created earlier.
Mirrored Resources:
Subnetworks: Add
my-subnetwork.Instances: Add
source-instance.
Set Filters:
IP Protocol: TCP
CIDR Range:
0.0.0.0/0(mirror all traffic).Direction: BOTH (ingress and egress).
Why BOTH?
Captures the full context of a network interaction (requests and responses).
Save the packet mirroring policy.
Troubleshooting
Mirrored traffic is not appearing in Astra. Astra Packet Processor must be installed and running to process mirrored traffic and generate API traces. If you have not set it up yet, see: How to Set Up Astra Packet Processor for Cloud Mirroring.
I want to know the cost of GCP Packet Mirroring. Refer to the GCP pricing page at https://cloud.google.com/vpc/pricing and search for "packet mirror".