How-To: Network Reachability Between Astra and Your Applications
Last updated: August 18, 2026
Before Astra can scan your applications, we need a clear network path to each target. Not every application sits in the same place on your network, so the right setup depends on where the target lives:
Scenario | Description | What's required |
|---|---|---|
1. Open public application | Publicly reachable on the internet, no IP or firewall restrictions | Nothing — Astra scans it directly |
2. Restricted public application | On the public internet, but firewalled to a small set of allowed IPs | You allowlist Astra's fixed scanning IPs |
3. Internal / private network application | Not internet-facing at all — lives inside a VPC, VPN, or on-prem network | You set up a connectivity path (e.g. Envoy proxy or an outbound tunnel) into your private network |
Scope of this article: This guide covers reachability for Astra's automated scanning products — DAST, API scanning, and Autonomous Pentesting.
Human-led / manual penetration testing follows a different engagement process with its own access arrangements; if that's what you're setting up, check with your Astra CSM rather than following the steps below.
This article walks through each scenario, what you'll need to configure on your end, and what to expect from Astra during setup.
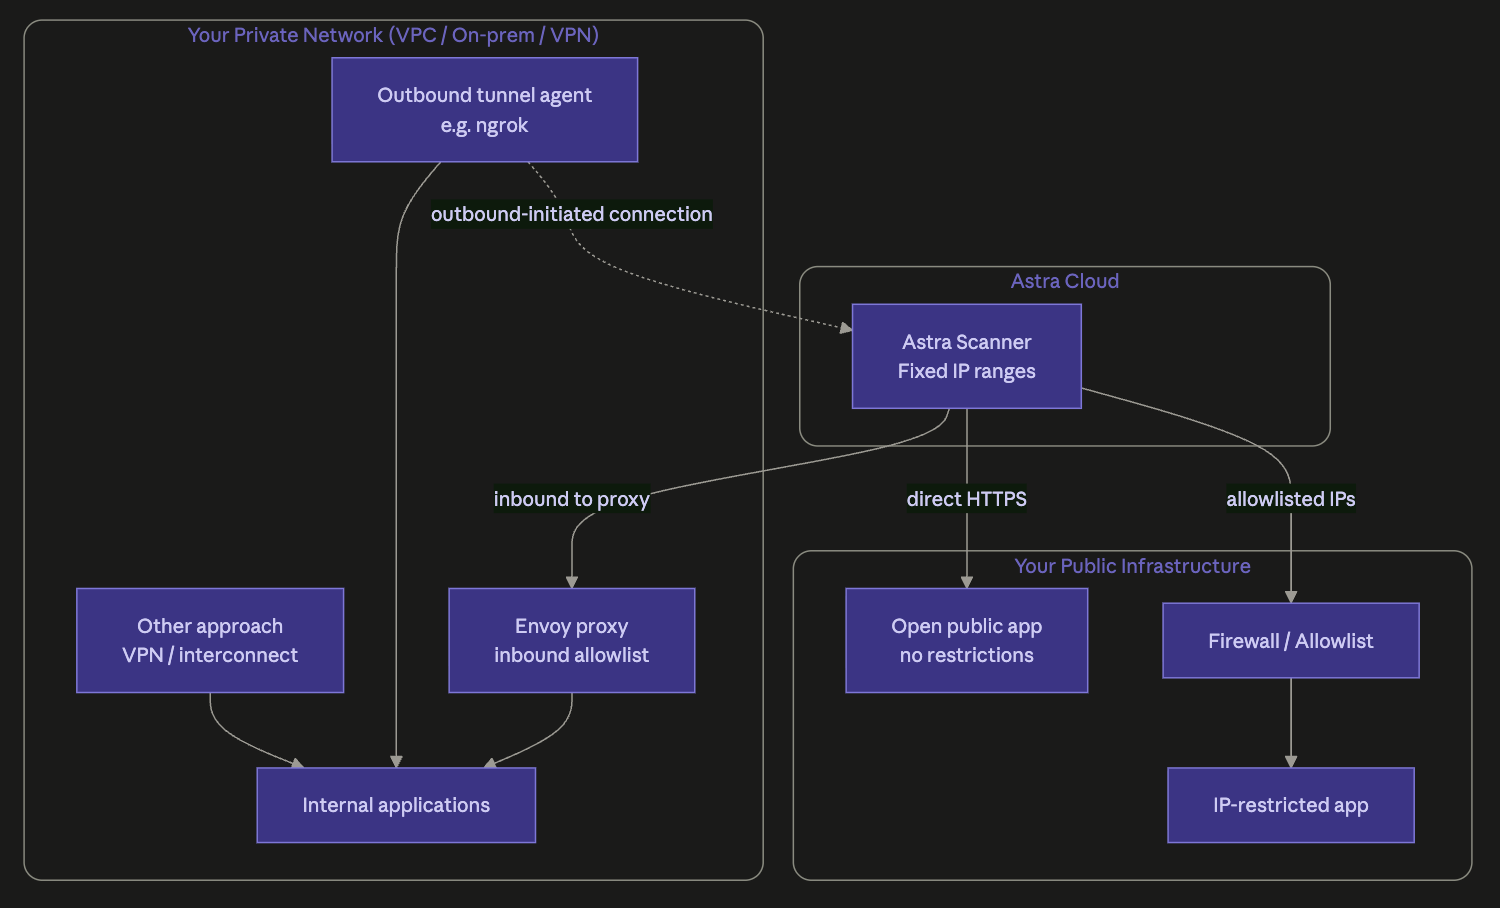
Scenario 1: Open public applications
When this applies:
Your application resolves on the public internet and accepts connections from any source IP — there's no firewall, WAF allowlist, or geo/IP restriction blocking external scanners.
Reachability path:
Astra Scanner (Fixed IPs) → Public Internet → Your ApplicationWhat you need to do:
Nothing. Our scanners connect directly over HTTP/HTTPS (and, where in scope, perform port/network-level checks) the same way any external visitor would.
If you run a WAF or bot-protection layer (e.g., Cloudflare, Akamai) in front of the app, it's worth checking that it won't rate-limit or block Astra's scanner IPs mid-scan — that can look like a restriction even though the app is otherwise open. If you're not sure, treat it as Scenario 2 below and allowlist Astra's IPs to be safe.
Scenario 2: Public applications restricted to specific IPs
When this applies:
Your application is hosted on the public internet, but access is locked down to a specific allowlist of IP addresses. This is common for staging environments, admin panels, partner-only APIs, or apps sitting behind a corporate firewall or VPN gateway that still expose a public IP.
Reachability path:
Astra Scanner (Fixed IPs) → Your Firewall / Allowlist → Your ApplicationWhat you need to do:
Get Astra's current list of fixed scanning IP ranges from here
Add these IPs to the allowlist on whichever layer is enforcing the restriction — this could be a cloud security group, on-prem firewall, WAF rule, or load balancer ACL.
Confirm both HTTP/HTTPS traffic and any additional ports in scope (if a port scan is part of your engagement) are permitted from Astra's IPs.
Let your Astra contact know once the allowlist is live, so a test connection can be run before the full scan starts.
Good to know:
Astra's IP ranges are fixed but can change over time - always pull the current list rather than reusing an old one.
If your infrastructure rotates IPs dynamically (e.g., autoscaling behind a changing set of public IPs), this approach becomes harder to rely on. In that case, talk to your Astra contact — a Scenario 3 connectivity option is often a better fit even if the app is technically public-facing.
Scenario 3: Internal / private network applications
When this applies:
Your application has no public-facing route at all — it's only reachable from within a private network (VPC, on-prem LAN, site-to-site VPN, etc.), and exposing it to the internet just for scanning isn't feasible or acceptable.
There's more than one way to give Astra reachability into a private network. Which one fits best depends on your infrastructure and what your security team is comfortable allowing — a firewall rule that only accepts inbound connections from Astra's IPs, or a lightweight agent that opens an outbound-only connection from inside your network, with no inbound ports required at all.
Option A: Envoy forward proxy (self-hosted)
You deploy an Envoy proxy VM inside your network. It accepts inbound traffic only from Astra's fixed scanning IPs and forwards it to your internal applications.
Reachability path:
Astra Scanner (Fixed IPs) → Envoy Forward Proxy (in your private network) → Your Internal Application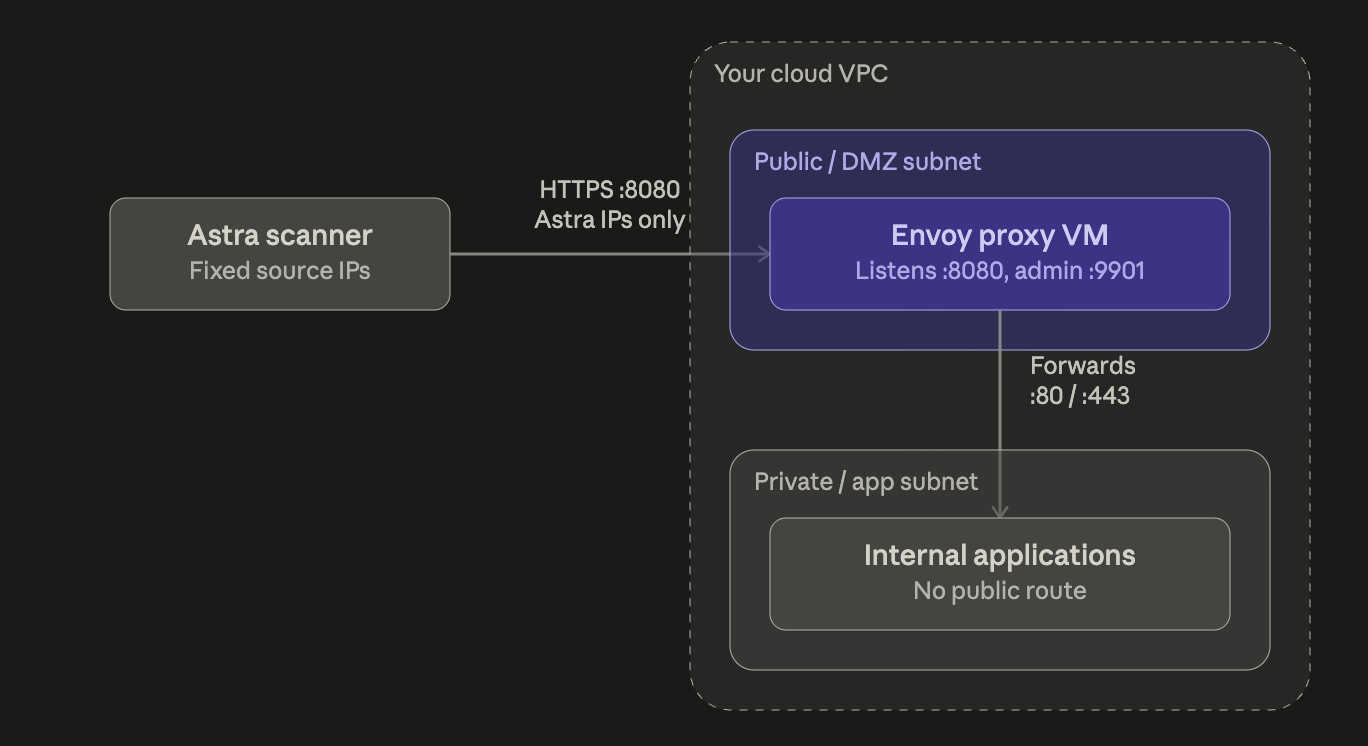
What you need to do:
Provision a VM (or container) inside your private network that has network access to all the internal applications you want scanned.
Deploy Envoy on that VM, configured as an HTTP dynamic forward proxy.
Configure your firewall so the proxy only accepts inbound traffic from Astra's fixed scanning IPs, and only allows outbound traffic to the internal apps in scope.
Enable access logging on the proxy for auditability.
Share the proxy's connection details (IP, port, and any auth headers) with your Astra contact so our scanners can be configured to route through it.
Astra runs a test connection to confirm reachability before your full scan begins.
Good to know:
This path generally supports HTTP/HTTPS only — non-HTTP services can't be scanned through it.
Full network or port scans may be limited, since the proxy typically only forwards traffic on specific ports (80/443).
All traffic funnels through a single proxy instance, so large scans may see added latency.
One proxy can front multiple internal applications — you don't need a separate proxy per app.
Full deployment instructions, an Ansible playbook, and Kubernetes manifests are available in the Envoy Forward Proxy guide.
Option B: Outbound tunnel (e.g. ngrok site-to-site connectivity)
If your security policy prefers not to open any inbound firewall rules, you can instead install a lightweight agent inside your network that establishes an outbound-only connection out to a relay. Astra's scan traffic is then routed back through that tunnel to reach your internal applications — your network never needs to accept an inbound connection.
ngrok's site-to-site connectivity is one example of this model, and is a common choice for teams that want to avoid inbound allowlisting entirely. The exact configuration (agent placement, encryption model, access controls) is worked out together with your Astra contact based on your environment.
Reachability path:
Astra Scanner (Fixed IPs) → Relay (e.g. ngrok) → Tunnel Agent (in your private network) → Your Internal Application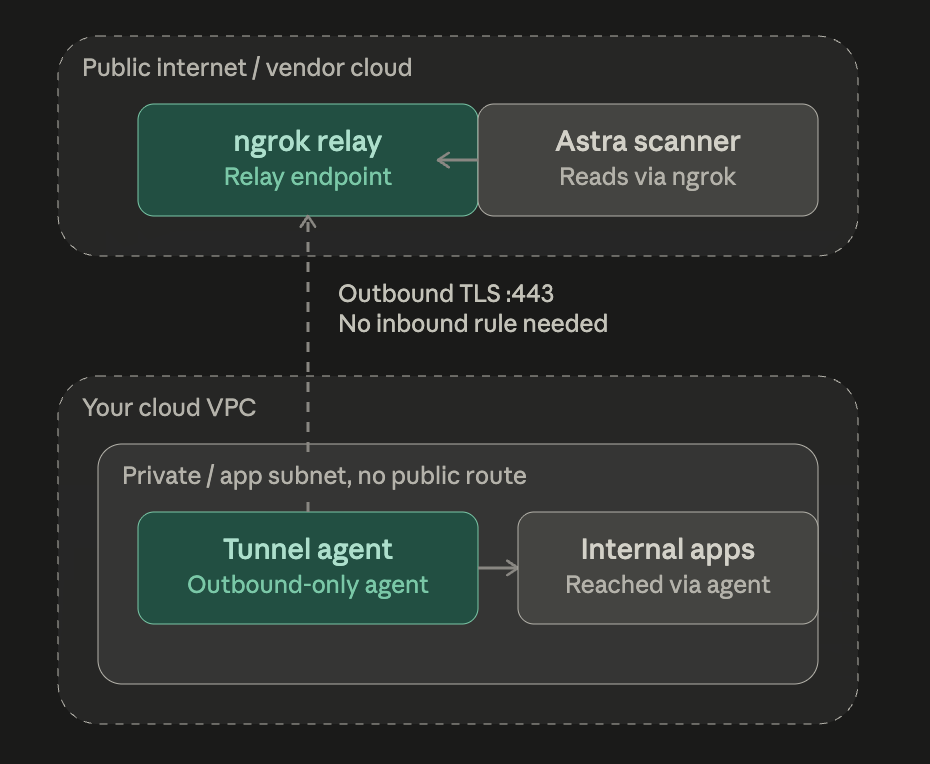
Note the direction of the underlying connection is reversed from the other paths above: the tunnel agent inside your network initiates an outbound connection out to the relay — Astra never opens a connection into your network. Once that tunnel is established, Astra's scan requests are routed back through it to reach your application.
What you need to do:
Choose a host or container inside your private network that has network access to all the internal applications you want scanned.
Install the tunnel agent (e.g. the ngrok agent) on that host.
Configure the agent to establish an outbound-only connection to the relay assigned for your account.
Apply access controls on the tunnel endpoint — IP restrictions, authentication, or a custom connect URL — so only Astra's traffic can reach your applications through it.
Share the tunnel/relay endpoint details with your Astra contact so our scanners can be configured to route through it.
Astra runs a test connection to confirm reachability before your full scan begins.
Good to know:
No inbound ports need to be opened on your firewall — the agent only calls out.
Like the Envoy option, this path is generally suited to HTTP/HTTPS traffic rather than arbitrary network/port scanning.
Security controls (IP restrictions, authentication on the tunnel endpoint, custom connect URLs, etc.) can be layered on to restrict the tunnel to Astra traffic only.
More on how this model works from the provider's side: ngrok's guide for end customers.
Other approaches
VPN peering, dedicated interconnects, or other mechanisms may also be viable depending on how your network is architected.
For enterprise engagements, Astra typically runs a short solutioning session with your team to walk through your infrastructure, security requirements, and constraints, and lock in the right implementation together before scanning begins.
If your applications span more than one scenario
Most organizations don't fall neatly into one bucket — it's common to have a mix of all three across an application portfolio. A simple way to sort your applications:
Can it be reached from any internet IP today? → Scenario 1.
Can it be reached from the internet, but only from an allowlist? → Scenario 2 — get your allowlist updated.
Is there no public route at all? → Scenario 3 — pick a connectivity option with your Astra contact.
If you have a large number of internal applications, a single Envoy proxy or tunnel agent can typically front all of them, as long as it has network-level access to each target — there's no need to stand up a separate connection per application.
Next Steps
Take stock of which scenario each of your applications falls into using the checklist above.
For any Scenario 2 applications, request Astra's current fixed IP list and get your allowlist updated.
For any Scenario 3 applications, reach out to your Astra contact to discuss which connectivity option (Envoy, outbound tunnel, or another approach) fits your environment best.
Once reachability is in place, Astra will run a test connection for each application before the full scan starts, so any misconfiguration gets caught early.
Have questions about your specific setup, or need this scoped for a manual penetration test instead? Reach out to your Astra contact or support team and we'll help you figure out the right path.