How-To: Configuring Your Target for DAST with 2FA Enabled
Last updated: July 14, 2026
Introduction
If your application enforces Two-Factor Authentication (2FA/MFA), Astra's DAST scanner may not be able to log in and scan effectively without additional configuration. Below are four methods you can use to enable scanning on targets protected by MFA.
Prerequisites
Access to the Target Settings in your Astra dashboard.
The Chrome DevTools recorder to capture login sequences.
For custom scripts, you must have the ability to export recordings as Puppeteer JS files.
Instructions
Option 1: Use a Static OTP for Staging Environments
This is the most seamless method for testing environments that allow a fixed code for bypass.
Verify your staging environment supports a static OTP..
Use the Chrome Login Recorder to record your login flow.
Enter the static OTP during the recording process as you normally would.
Upload the resulting recording file to the Target Settings > User credentials >Login Recording section of your dashboard.
Add your test user's email and password in Target Settings > User credentials
Option 2: Disable MFA on Dedicated Test Accounts
If static OTPs are not supported, you can bypass the prompt entirely by using an unprotected account.
Create a dedicated testing account within your application.
Disable MFA specifically for that account.
Record the login sequence (which will no longer show a 2FA prompt) and upload it to Login Recording.
Add this user's credentials to the User Roles section in the Astra dashboard.
Option 3: Custom Login Script (For TOTP-based MFA)
If you use an authenticator app (e.g., Google Authenticator), Astra can implement a script to generate these codes dynamically.
Record your login flow using Chrome and enter any valid OTP code during the process.
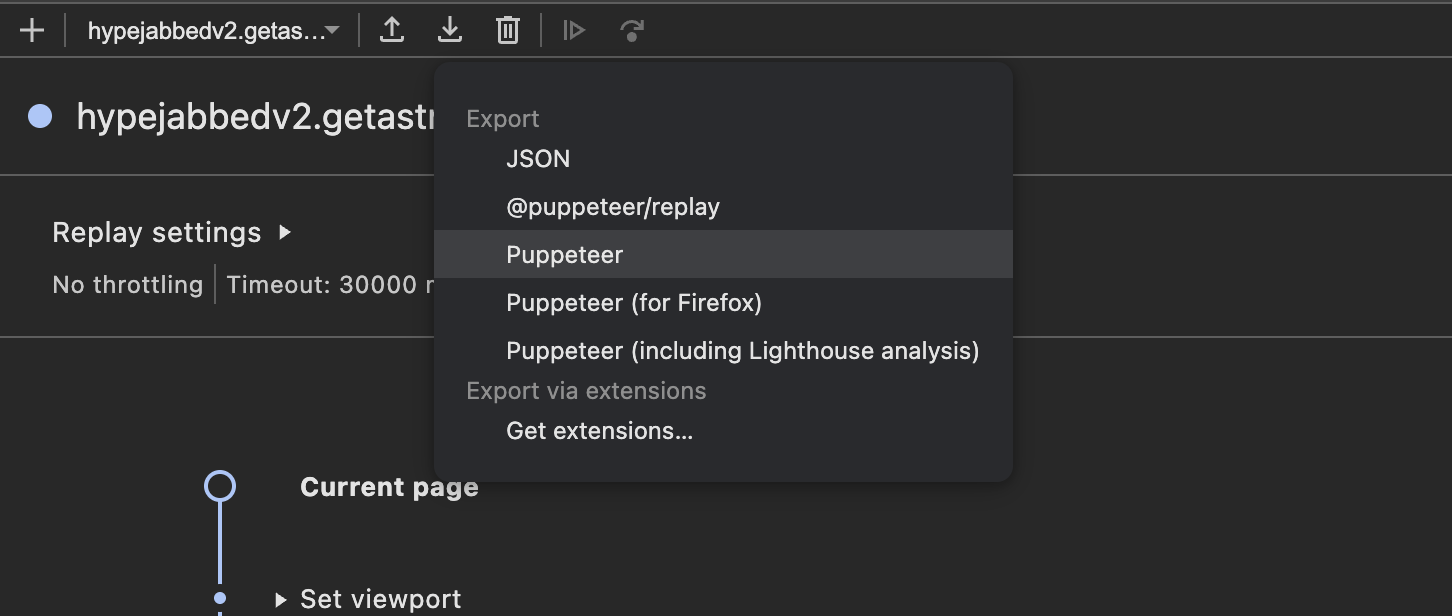
Export the recording as a Puppeteer JS file (ensure it is not a JSON file).
Ensure user credentials are saved in Target Settings.
Raise a support ticket at help@getastra.com including:
A link to your Target Settings page.
The exported JS file.
The TOTP MFA secret (seed) used to generate your codes.
Astra will implement the logic and notify you once the custom script is active.
Option 4: Set Authentication Headers Manually
This is a quick workaround for one-off scans but is not recommended for automated pipelines.
Log in to your application manually in your browser.
Open DevTools > Network tab and copy your Authorization header or session cookies.
Navigate to Target Settings > Advanced settings in the Astra dashboard.
Paste the header name and value there.
Option 5: Custom Login Script for Email OTP or Magic Link-based MFA
If your application sends a one-time password or magic link to the user's email instead of using an authenticator app, Astra can implement a custom script to retrieve and process these emails automatically.
Record your login flow using Chrome, triggering the OTP or magic link email as you normally would.
Export the recording as a Puppeteer JS file (ensure it is not a JSON file).
Ensure your test user's email and password are saved in Target Settings > User credentials.
Confirm your test account's inbox is reachable by Astra (for example, dast@getastra.com or its alias), since the application must send the OTP or magic link to this address.
Raise a support ticket at help@getastra.com including:
A link to your Target Settings page.
The exported JS file.
Confirmation of whether your app sends an OTP code or a magic link.
Astra will implement the logic to poll for the email, extract the OTP or magic link, and complete the login, then notify you once the custom script is active.
Expected Outcome
The scanner will be able to bypass 2FA prompts and perform an authenticated crawl, allowing it to identify vulnerabilities within restricted areas of your application.
Troubleshooting & Limitations
Manual Header Expiration: Be aware that tokens copied manually will expire, requiring you to refresh them before every scan.
Unsupported MFA: Astra currently supports TOTP-based and Email-based MFA (OTP or magic link) - SMS OTP support is not currently available.
CI/CD Compatibility: Only Options 1, 2, and 3 are suitable for automated CI/CD pipelines.
Connection Errors: If the scanner still cannot log in, ensure you have
allowlistedAstra's static IP addresses in your firewall or MFA system.
Summary
Method | MFA Required | Automation-Friendly | Best For |
Static OTP | ✅ Yes | ✅ Yes | Staging/test environments |
MFA Disabled for Test Users | ❌ No | ✅ Yes | Isolated test accounts |
Custom Script via Support | ✅ Yes (TOTP) | ✅ Yes | TOTP-protected logins, Email-based OTP or magic link logins |
Manual Auth Headers | ✅ Yes | ❌ No | One-off scans or manual testing |
For any questions or help with setup, please reach out to our support team via the in-dashboard support widget or by raising a support ticket.